
As an optimizer, it’s your responsibility to understand the implementation and analysis of digital analytics. Gone are the days of relying on the IT department to help you with basic analytics tracking. [Tweet It!] Fortunately, Google Tag Manager makes it easy.
Still, many optimizers don’t use Google Tag Manager (or any tag manager, for that matter) because it looks daunting. The truth is that once you understand the basics, it essentially becomes a second language.
If you put in the work to understand the verbs and the nouns, Google Tag Manager will make your life much easier. You’ll be a smarter, more efficient, more productive optimizer for it.
Table of contents
Why Should You Be Using Google Tag Manager?
A while ago, we published an article called How “Tag Management” Can Improve Site Performance, which explained the definition of a tag…
When people talk about “tags” they’re talking about the snippets of javascript provided by 3rd party services like Google Analytics, DoubleClick, AdRoll, Adobe SiteCatalyst, etc. Every 3rd party tool like these you bring to your site to improve your ability to reach & serve customers means adding a new piece of javascript – aka a tag – to your site.
A tag manager, then, is designed to organize these tags in an efficient way, limiting the need for advanced technical skills.
When asked why Google Tag Manager is so useful, our own Leho Kraav had this to say…

Leho Kraav, CXL:
“Primary usefulness stems from code centralization and container revision control.
Centralization provides the ability to discard expired code at an appropriate velocity (often you run temporary marketing tools) and make sure any new tags accounts for what’s already there – avoid conflicts, mis-implementations etc.
And all of this power and ordering the chaos is available in a graphical user interface that non-wizards are also able to understand with a significantly lower barrier compared to direct file-level code changes.
Why use?
- Your business is likely to have less technology problem costs
- If problems with any tags arise, debugging and fixing things is likely to take less time compared to file level code changes
- Pre-built tags provide quicker implementation ability”
He added that Google Tag Manager is not the only tag management option. “Whatever you’re writing about GTM, applies to tag management technology in general. There are more providers out there for this than just Google,” he said.
Here are some other options…
However, since Google Tag Manager is arguably the most accessible and is literally designed for Google Analytics, that will be our focus.
Chris Mercer of SeriouslySimpleMarketing.com offered some additional insight into why you should be using Google Tag Manager…

Chris Mercer, SeriouslySimpleMarketing.com:
“I like to think of GTM like a video game controller. It controls what specific actions get tracked and how they get tracked. It’s incredibly helpful to have all of your tracking in one spot so you can easily see what’s going on and, if you need to adjust or add any new tracking, everyone on the team knows where to do it.
The biggest reason to use GTM is that it keeps all of your tracking under one roof and (because of its tight integration with tools like Google Analytics) it can help free up your development resources (since you can now track things like Google Analytics Events with just a few clicks).”
Yehoshua Coren of Analytics Ninja emphasizes the added consistency and accuracy Google Tag Manager provides…

Yehoshua Coren, Analytics Ninja:
“In my experience, the biggest benefits of a Tag Management System is that one’s tagging becomes less IT reliant (don’t shut them out though, IT should be involved), tagging becomes more consistent and accurate, and relatively complex tagging tasks can be done via a rule driven, graphical interface.” (via CXL)
While Google Tag Manager is (relatively) easy to use and is designed to make your life easier, it’s easy to make mistakes when you’re just starting out. Here are some of the most common mistakes, according to Leho…
Leho Kraav, CXL:
- “Pile too many tags on a site, you will slow the page load down, visibly. Just because it’s easy doesn’t mean you should load yet another marketing tag on the site.
- Failure to discard or disable non-used tags. Test new tracking tools, but discard the tag if you don’t proceed past the trial period.
- Deploy custom HTML tags that break something on the site, but there’s inadequate analytics alert setup or not enough QA to detect it for a long period of time.
- Give too much account privileges to inappropriately qualified people – on large sites, container publish rights should only be retained for people who understand in enough detail what the last set of container changes are that they’re about to publish. Understand preferrably at software development understanding level.”
Chris adds that A/B testing tools can cause problems if they’re not handled correctly…
Chris Mercer, SeriouslySimpleMarketing.com:
“Another is trying to fire split testing scripts like VWO or Optimizely through GTM. If you do try to do that, it’ll cause your page to ‘flicker’, which can invalidate any testing results since it puts the visitor ‘on alert’ that something may be different.”
For best results, plan out your Google Tag Manager implementation before you begin. Define your goals, decide what you need to track on each page, list out the third-parties involved, etc.
This process will be different for everyone. Some of you will only be dealing with Google Analytics and AdWords. Others will be managing tags from a dozen third parties.
Below, you’ll go through the basics to familiarize yourself with tags, triggers and variables.
How to Set Up Google Tag Manager
Step 1: Installing the Google Analytics Tag
As with any analytics tool, you’ll need to create, deploy and test your first tag. To do that, you’ll need a Google Tag Manager account. If you have a Google account, you can simply use that to create your account.
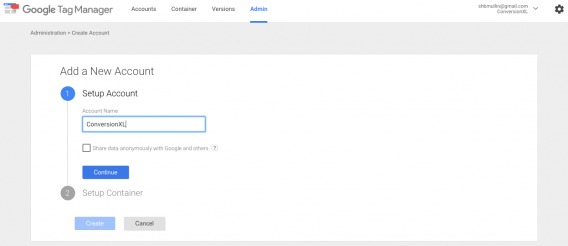
Next, you’ll set up a container, which can either be web, iOD or Android.

After agreeing to the terms, you’ll be given a Google Tag Manager code, which you should insert directly after the <body> tag on every page of your site. (Note: If you ever need the code again, it’s safely stored in the Admin panel.)
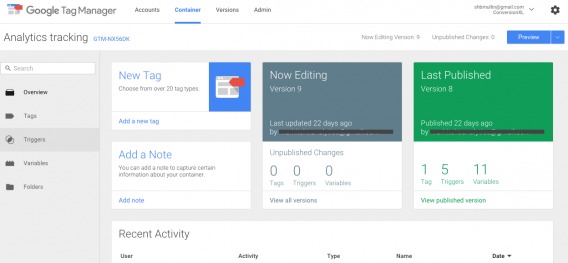
Within your dashboard, you’ll be able to…
- Add tags and notes.
- See unpublished tags, triggers and variables.
- View published tags, triggers and variables.
- Review recent container activity.
Take a look…
Since Google Tag Manager and Google Analytics work together, we’ll start by setting up the standard Google Analytics Pageview tag.
Clicking “New Tag” will take you here…
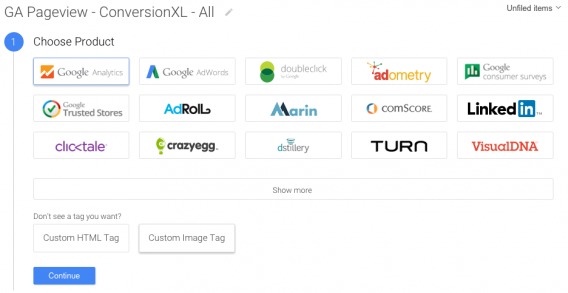
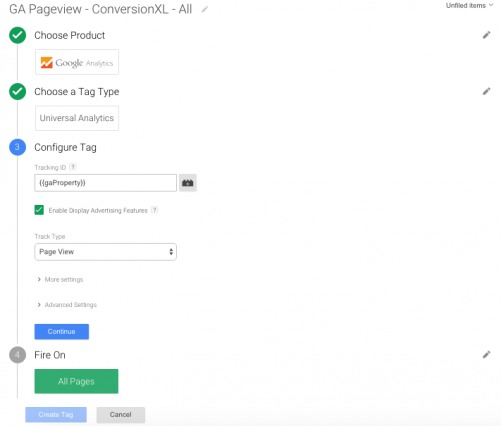
We’ll name it “GA Pageview – CXL – All”. It’s important to be specific when naming tags. Eventually, you might have hundreds of tags. If they’re not named properly, you’ll run into organizational issues.
Chris Mercer, SeriouslySimpleMarketing.com:
“One of the most common mistakes is not naming your tags correctly. It’s pretty easy to lose track of what you have in place when you have over 100 tags running.”
Choose a naming format now and share it with the rest of your Google Tag Manager-using team.
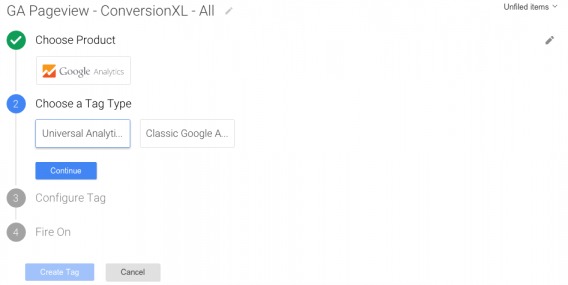
Next, select “Google Analytics” and “Continue”.
For step two, you’ll want to select “Universal Analytics”. You should be using Universal Analytics at this point as it’s the operating standard. Click here to see what is being phased out thanks to this change.
In step three, you’ll be asked for your Google Analytics Tracking ID, which you can find in Google Analytics under Admin > Property Settings.
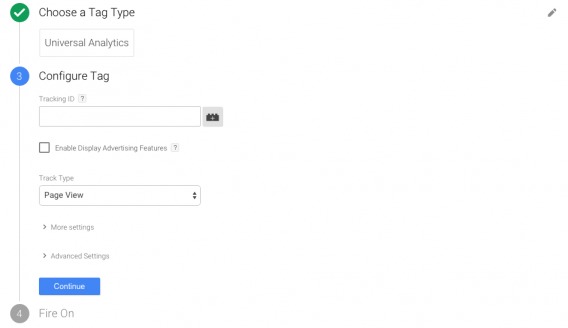
Click “Enable Display Advertising Features” if you plan to use Google’s remarketing features. Track Type should be “Page View”, which is already selected.
Moving on, you must decide when and where you want the tag to fire…
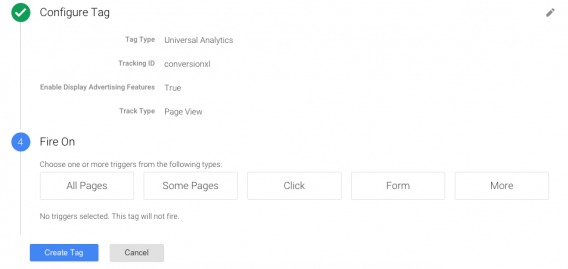
These are called triggers. Since you want to collect all data, you should select the “All Pages” trigger.
When you click “Create Tag”, you’ll be taken to your list of tags. Note that your tag has not been published yet. In order to do that, you’ll need to click the “Publish” button in the top, right-hand corner of the page.
Before your changes are published, preview them to make sure everything is working correctly. When you open your site in the same browser, you will see a preview box…

Here, you’ll see that the Bounce Exchange tag is fired on this page. Simply confirm that your tag is displaying on every page before publishing.
Next, head to Google Analytics to ensure it’s being tracked properly. For example, since you’re in Preview Mode, there should be at least one visitor.
Step 2: Setting Up the Property Variable
Next, you’ll want to set up a user-defined Google Analytics Property variable to save yourself time…
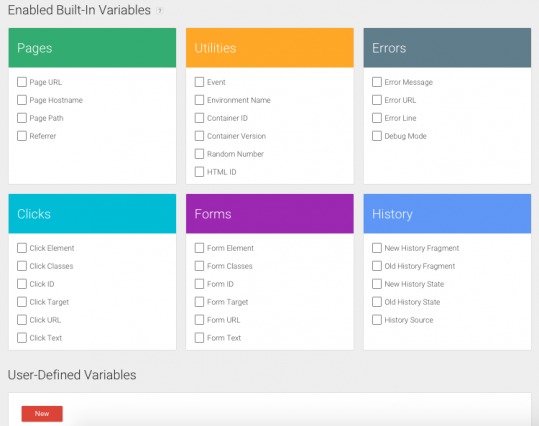
Above, you can find pre-defined, built-in variables. You’ll want to scroll down and select “New” under “User-Defined Variables”.
Name your property something like “gaProperty” and select “Constant” since you want to be able to reference the same value for multiple tags…
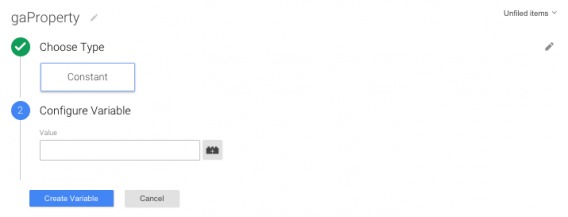
Within “Value”, enter your Google Analytics ID again. Now, you’ll be able to use the gaProperty variable wherever you would normally enter your Google Analytics ID.
To see this in action, head back to the tag you created earlier by selecting “Tags” on the left-hand side of the dashboard. Then, edit the tag you created…
Where “Tracking ID” was formerly a manual entry, you can now click the button to the right of the field and select “gaProperty”.
Click here to get a better understanding of what each of the built-in variables do. They work the same way user-defined variables do.
Step 3: Setting Up Cross-Domain Tracking
Cross-domain tracking is important if your site operates on two different domains. For example, CXL Live’s site is a sub-domain. Cross-domain tracking allows those two domains to communicate and prevents fragmented data.
To start, create two constant user-defined variables: “gaDomain” and “gaCrossDomains”. “gaDomain” will write cookies to the highest level domain, which will ensure it’s maintained across sub-domains. “gaCrossDomains” will allow you to list all of the domains you want to track.
Starting with “gaDomain”…
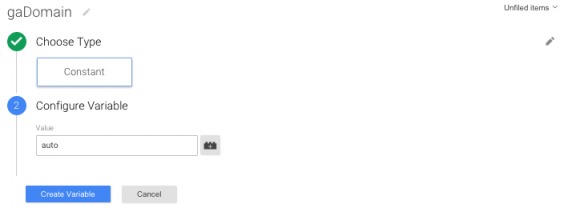
Again, you choose “Constant”. This time, set the “Value” to “auto”, which tells Google Tag Manager that cookies automatically get written to the highest level domain.
Now, move on to “gaCrossDomains”…
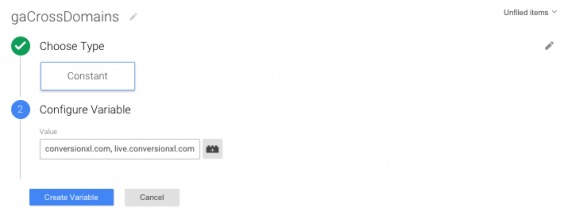
This time, enter the domains you want to track in the “Value” field.
To see it in action, head back to your Pageview tag and edit it…
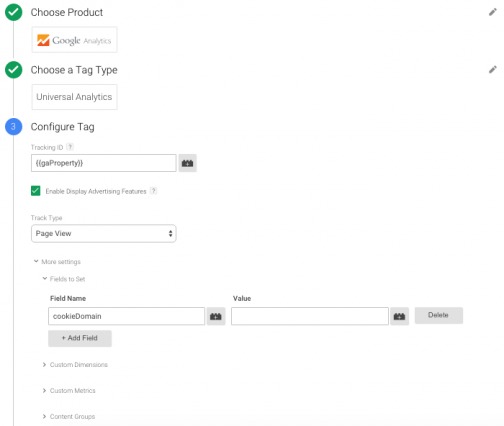
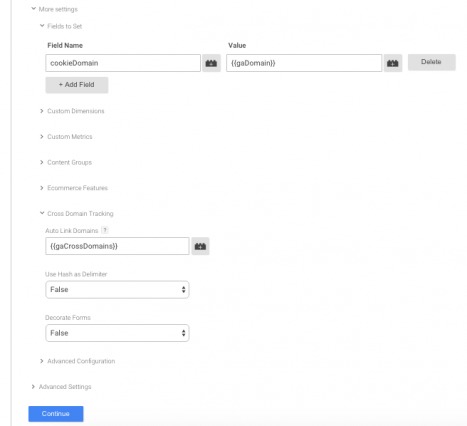
Under “More settings”, you’ll find “Fields to Set”. For “Field Name”, look for “cookieDomain” and for “Value” look for “gaDomain”.
Then, you need to select “Cross Domain Tracking” and add the “gaCrossDomains” variable…
To ensure everything is set up correctly, head to Google Analytics and look in “Real-Time”. You should see data being captured from all of the domains you’ve listed in the Google Tag Manager variable.
Step 4: Understanding the Data Layer
There are two ways Google Tag Manager captures data:
- Extracting data directly from the source code or browser.
- Using the Data Layer to pass data to other applications.
Understanding and implementing the Data Layer is key because it doesn’t rely on the source code, which can be fragile. When changes are made to your site, the Data Layer preserves the code for you.
The Data Layer is a Javascript object that holds data passed on from your site. It’s structured into key-value pairs, which are either passed along to applications like Google Analytics or used to determine when tags should fire.
For example, CXL could have a “blogCategory” variable with categories like “UX / Design”, “Copywriting”, “A/B Testing”, etc.
We could then show specific calls to action to specific readers based on the type of content they were viewing most recently. Right now, you would match the “Digital Analytics” category, so we would show you a call to download our latest analytics guide in exchange for your email.
Alternatively, you can write custom Javascript that pushes the data to the Data Layer. That means the data is being collected independent of the tags on the page.
Confused about how the Data Layer works? Here’s how Google explains it to developers…
To ensure maximum flexibility, portability, and ease of implementation, Google Tag Manager functions best when deployed alongside a data layer. A data layer is an object that contains all of the information that you want to pass to Google Tag Manager. Information such as events or variables can be passed to Google Tag Manager via the data layer, and triggers can be set up in Google Tag Manager based on the values of variables (e.g., fire a remarketing tag when purchase_total > $100) or based on the specific events. Variable values can also be passed through to other tags (e.g., passpurchase_total into the value field of a tag).
Above your Google Tag Manager container snippet, add this code to set up the Data Layer…
<script>
dataLayer = [];
</script>
Of course, this is empty code. Using the purchase total example above, Google provides this example code…
<script>
dataLayer = [{
‘pageCategory’: ‘signup’,
‘visitorType’: ‘high-value’
}];
</script>
For more information on the Data Layer, see the Google Tag Manager Developer Guide.
How to Collect and Track Data Using Google Tag Manager
Step 1: Passing Static Values
You know that Google Tag Manager allows you to pass data to Google Analytics, right? Well, you can then use Custom Dimensions in Google Analytics to segment your user data.
Going forward, let’s assume you run an eCommerce site. That will allow you to fully understand the power Google Tag Manager.
First, you’ll want to create a user-defined Data Layer variable that tells Google Tag Manager when to collect product category information.
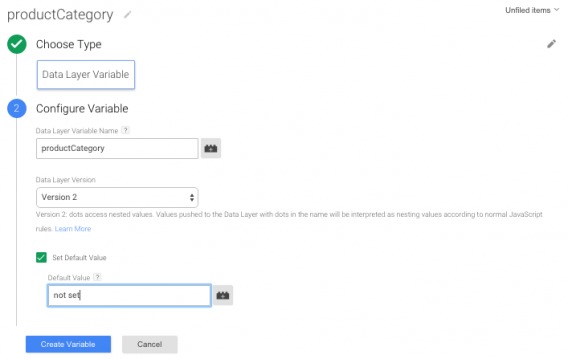
This time, your type is “Data Layer Variable” instead of “Constant”. Leave the “Data Layer Version” at the latest version (Version 2). Check the “Set Default Value” box and enter “not set”. This will appear in Google Analytics if values are not recorded as expected.
You can follow the same process if you have additional variables.
When you add the Data Layer code to the correct page of your site, the data will be captured. (Remember, you can enter pre-defined values manually or have your developers set up a Javascript push code.)
Now, when visitors select a product category, it will be recorded in the Data Layer. However, that data still needs to get from the Data Layer to Google Analytics.
So, head to Google Analytics > Admin > Custom Definitions > Custom Dimensions > New Custom Dimension.
Name your dimension “Product Category” and leave the scope as “Hit” (for more information on scope, click here). You can follow the same process if you have additional variables.
On the next screen, you’ll be given code snippets. Each snippet has a dimension number, which will need to be entered into Google Tag Manager to ensure the tag is connected to the proper dimension.
Head back to your Pageview tag in Google Tag Manager. Click “Copy” in the bottom, right-hand corner.
This time, we’re not tracking a “Page View”, we’re tracking an “Event” (i.e. someone selects a product category). So, we’ll rename the copied tag accordingly and edit the configuration…
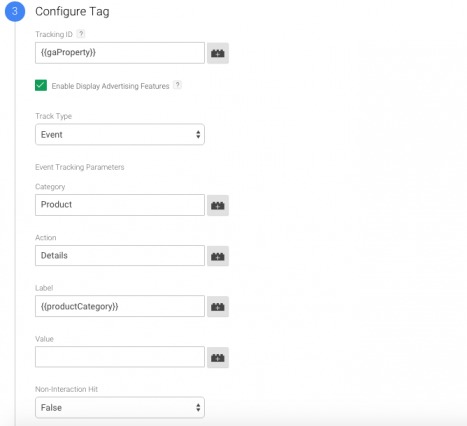
As you can see, “Category” and “Action” are named accordingly. “Label” is simply the user-defined variable you created earlier.
Next, you’ll need to edit “Custom Dimensions”…

If you recall, in Google Analytics, there was a dimension number. That’s also known as “Index”, so we enter that here. “Dimension Value” should be your same user-defined variable from before.
Now, we no longer want the tag to fire on every page. Instead, we want it to fire on click, so we select “Click” on step four of the tag creation process…
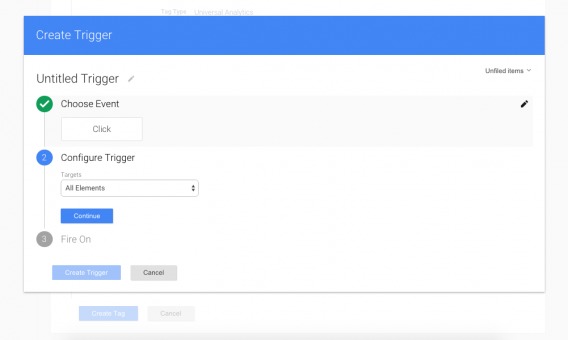
Here’s what the completed popup will look like…
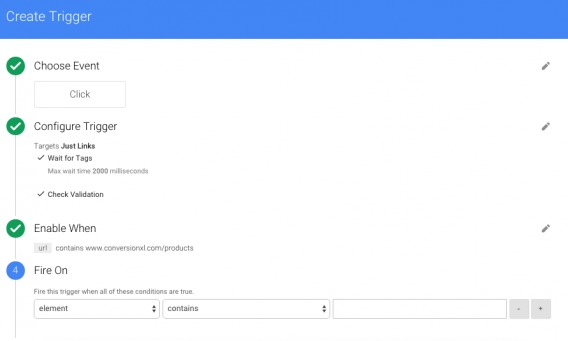
You can customize the details based on your own needs. It’s difficult to give specifics for this step as every site is set up differently. Essentially, you’re choosing the trigger, when the trigger is enabled and what conditions must be met for the trigger to fire.
When you create the trigger, you’ll be able to save your new tag.
In the preview window, you should be able to see the page’s value for “productCategory” under the “Variables” > “Page Load” tab. If that’s working, you’ll be able to add the Custom Dimension to your Google Analytics reports and view your data based on product category.
Using the standard Google Analytics, capturing this data would have meant manual recoding, redeploying scripts, etc. Very time-consuming. Instead, all you have to do is create a new tag in Google Tag Manager.
Step 2: Passing Dynamic Values
So far, you’ve been capturing static values. If you want to track dynamic values, like revenue, you can use Custom Metrics. First, we’ll create another user-defined Data Layer variable…
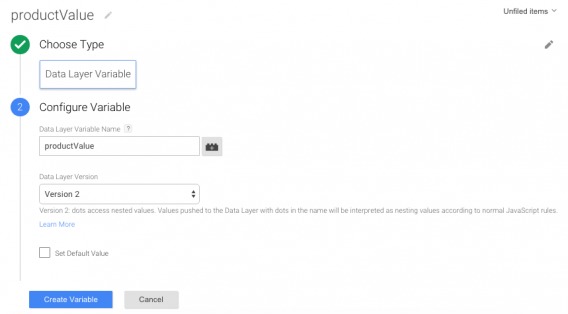
Next, add the Data Layer code to the thank you page. You’ll be able to send the value of the purchase to the URL and then use an additional Javascript code to to extract the price from the URL. Here’s an example from Google…
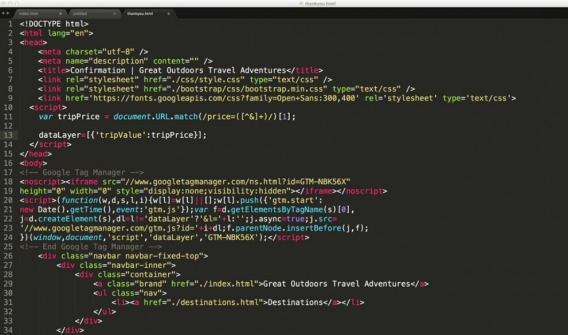
Note the use of the “tripPrice” variable, which pairs with “tripValue”.
Enter preview mode to ensure everything is working as expected. Under Data Layer, you should see “productValue” or, in Google’s case, “tripValue” and the actual value (e.g. $49.99).
Custom Metrics and Custom Dimensions are similar, so the set up process will seem familiar. Head to Google Analytics > Admin > Custom Definitions > Custom Metrics > New Custom Metric.
Name the Custom Metric “Product Value”, leave the scope as “Hit”, set the formatting type to “Currency”, then click “Create”. Custom Metrics have Index numbers as well, so be sure to note the Index of your new Custom Metric.
Now, head back to Google Tag Manager and edit your original tag…
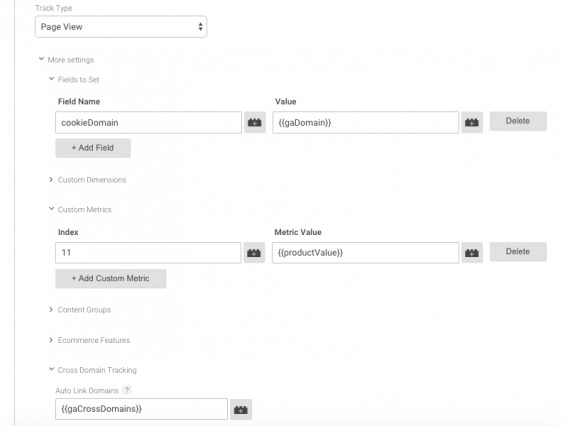
Simply enter your Custom Metric’s “Index” from Google Analytics. Your “Metric Value” is the user-defined Data Layer variable you just created.
Now, you can build a custom report in Google Analytics. Click Customization > New Custom Report…

Once you create something similar to the above, click “Add Metric” and add your Custom Metric. Then, save the report. Now you can really understand where your revenue comes from. Experiment with different metrics and dimensions!
Step 3: Tracking Events
Let’s now say that you run a blog, just like CXL. You want to know the conversion rate of your right-rail email newsletter opt-in. In other words, you want to divide the number of new subscribers by the total visitors. The best way to do that is with an event trigger, which will tell you how many times the “Subscribe” button is clicked.
First, we’ll set up a user-defined URL variable…
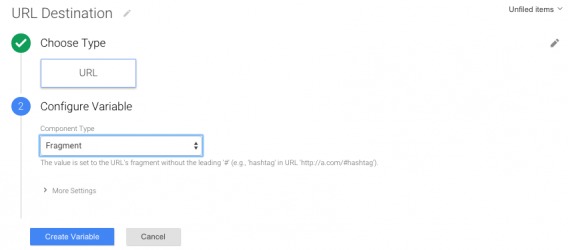
“Component Type” is set to “Fragment”, which means everything after the / will be included. For example, if someone subscribed on “www.cxl.com/blog”, it would return “blog”.
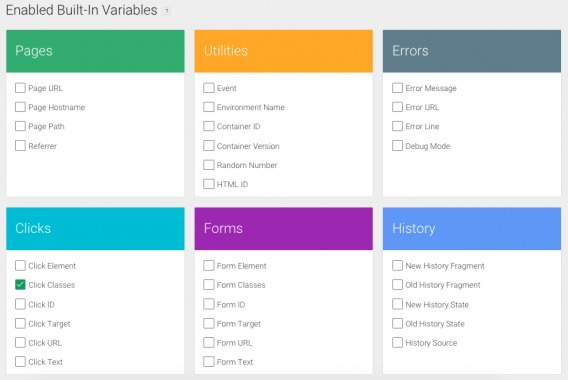
If you head to your site and use “Inspect Element” on your “Subscribe” button, you’ll see that it’s within a class. That will allow us to capture data. So, in Google Tag Manager, ensure “Classes” is checked in “Built-In Variables”…
Then, you’ll need to create the trigger itself…
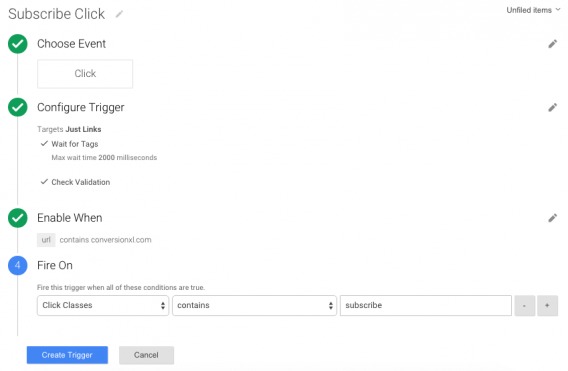
If your button is an HTML link styled as a button, select “Just Links”. At CXL, all of our blog posts are simply www.cxl.com/blog-post-title. So, we want the trigger to be enabled on all pages. Yours might be different. We want the trigger to fire only when the class contains “subscribe”. Again, this will be different for you. Use Inspect Element to find yours.
Now, we need to create a new tag. To do this, copy the original tag so that cross-domain tracking and the like is still in place. In configuration, change the type from “Page View” to “Event”…
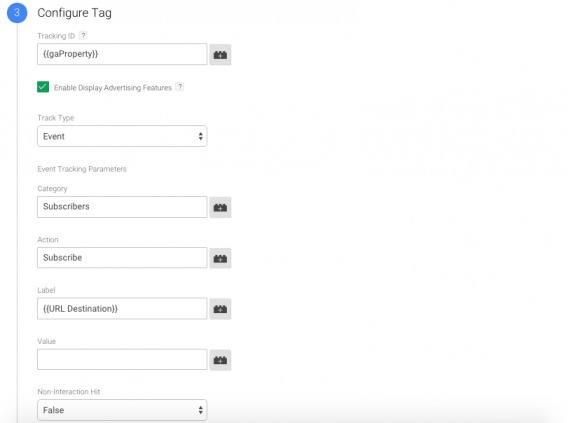
“Category” and “Action” are merely descriptive. “Label” should be the “URL Destination” variable you created earlier. Once that’s done, change the “Fire On” settings in step four…
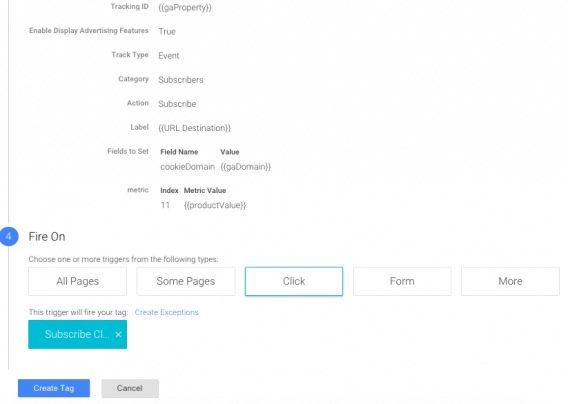
Select “More” and then choose the trigger you created earlier.
Now, you’ll be able to see this event in Google Analytics. There, you can divide the number of subscribers by the number of visitors to get the conversion rate. You can even break it down by blog post. For example, the conversion rate is higher on Blog Post A than Blog Post B.
How to Integrate PPC Efforts
AdWords Conversion Tracking
If you’re using AdWords, you can use Google Tag Manager to deploy the on-site code. First, you’ll need some information from your AdWords account. Go to Tools > Conversions > Choose your conversion. When you “Edit Settings”, you’ll be able to see the code for “Install your tag”. Note the Google Conversion ID and the Google Conversion Label variables.
Back in Google Tag Manager, you’ll want to create a new tag…
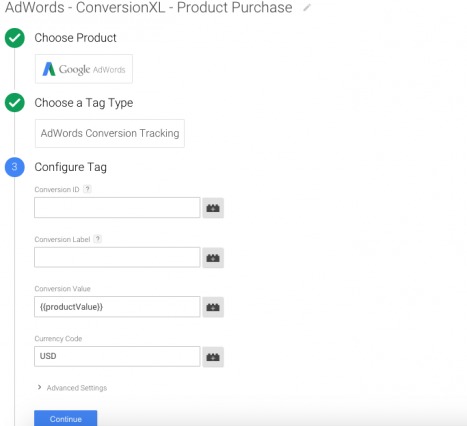
For “Conversion ID” and “Conversion Label”, enter the information from your AdWords account. Note that you’re using the “productValue” variable again.
Since you want to track across all pages, select “All Pages” in step four.
Then, test your configuration. Use preview mode and try testing a few AdWords clicks to ensure everything’s being tracked properly.
In Google Analytics, you can now map PPC traffic’s conversion path from keyword to purchase.
Conclusion
Yehoshua wrote an incredibly comprehensive guide to migrating to Universal Analytics using Google Tag Manager. I highly recommend taking the time to read it as a complementary article.
You can also find the answers to common Google Tag Manager questions here…
Now that you have a firm understanding of the basics, you can get started with Google Tag Manager. Come back next month for part two, where we go from beginner to intermediate. You’ll learn how to create unique tags that will improve your optimization abilities.
Related Posts
-

More and more business owners are learning about the benefits of the new version of…
-
In digital analytics, it’s all about asking the right questions. Sure, in the right context,…
-
After reading some subscriber feedback, we noticed that many CXL readers didn't have a solid…
-
This post is not a dry feature-by-feature comparison, nor does it include a winner-take-all verdict.…


I came here looking for more content inspiration, but found some really valuable data. It was supposed to be just a part of my daily routine with megaindex when I check backlinks and go in for the kill, in search for content ideas. but wow! I guess I’ll tweet about you too. Just thank you.
Hah! Glad you found the article useful, Camilla. Are you thinking of switching to GTM?
I don’t get what Google Tag Manager is… even Google’s own website is unhelpful in explaining… just says their tool is good for managing them… but what are tags?? And why would one use them?? How do they make analytics better??
Tools like Google Analytics, AdWords, AdRoll, Crazy Egg, etc. use Javascript. Typically, you add snippets to your site. These are tags.
As you grow, you’re likely to add new tools in an effort to reach more people and improve your on-site experience. Eventually, you’ll have a lot of different tags. This creates two big problems: you’re relying on your IT department to help you manage these tools (unless you know Javascript well) and managing all of your tags efficiently becomes nearly impossible. Tag managers help solve those problems (among many others).
Google released Google Tag Manager. It’s not the only option, but it is literally designed for Google Analytics. It allows you to see exactly what you’re tracking on each page. It makes it easy for your entire team to add / remove / update tracking without the help of the IT department. You can use it to track button clicks, values, etc. via Google Analytics, for example.
Hopefully the article is more valuable to you now. Thanks for reading!
Hey Shanelle,
Thank you for this great in-depth article on GTM. :)
I have a question regarding Google Ads Conversion Tracking:
Why is “All Pages” choosen as a trigger for this tag. I’ve also read the same in the official Google Tag Manager course but it doesn’t make sense to me.
In the general google “how to add conversion tracking to your website” guide: https://support.google.com/adwords/answer/6331314?hl=en
It says you should only add it to the conversion page e. g. the thank you site.
Greetings from Germany
Thomas
Hey Thomas! Thanks for reading.
Just to clarify, are you referring to the tag under “Step 3: Tracking Events”?
Hey Shanelle,
I was referring to this sentence:
“Since you want to track across all pages, select “All Pages” in step four.”
It’s here:
http://i.imgur.com/mmB9zeV.png
Here I marked the part where it says to only add the code to the conversion page.
http://i.imgur.com/9TD6ujp.png
Ah, I see. Thanks for the images!
So, my instructions were merely for syncing AdWords with your analytics. I selected “All Pages” so that I know if an AdWords ad refers any visitors to any page of my site. In Google Analytics, you can use traffic reports to see how well that AdWords traffic converts.
You can set up a separate tag on the post-conversion page as well.
Thanks, Shanelle, for a great article! GTM is an amazing tool and huge time saver for any marketer. I wrote a few articles on GTM myself, so happy to contribute if you plan to continue this series:
https://teamink.co/blog/how-to-track-install-app-button-google-tag-manager/
https://teamink.co/blog/how-to-track-email-sign-ups-with-google-tag-manager/
https://medium.com/@jev/10-cool-things-you-can-do-with-google-tag-manager-7f1d59d794f5#.wdo5ch7uq
Jevgenijs
Thanks for reading and for the suggestions, Jevgenijs. I’ll be sure to check them out for part two.