
After reading some subscriber feedback, we noticed that many CXL readers didn’t have a solid foundation regarding a proper Google Analytics setup.
That’s a problem. If Google Analytics isn’t configured properly, how do you expect to gather any insight?
Google Analytics can’t collect or change data on visits that have already happened, which means that waiting to add or correct settings is data lost or damaged. Collecting complete, accurate data is the first step toward a winning optimization campaign.
This post will show you how to set up your Google Analytics configuration correctly at the Account, Property, and View levels.
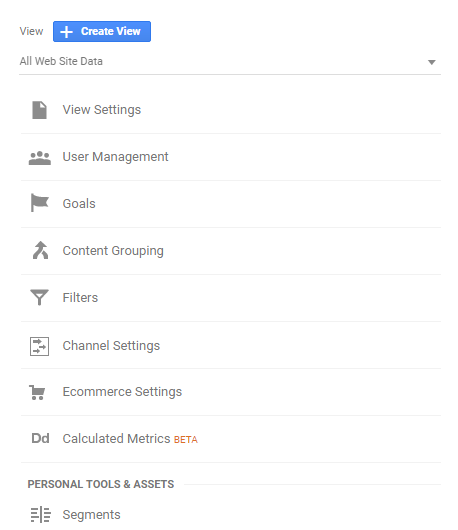
All the tools, settings, and changes we’ll cover are accessible via the Admin section of your Google Analytics account, which is the gear in the bottom-left portion of your Analytics screen:
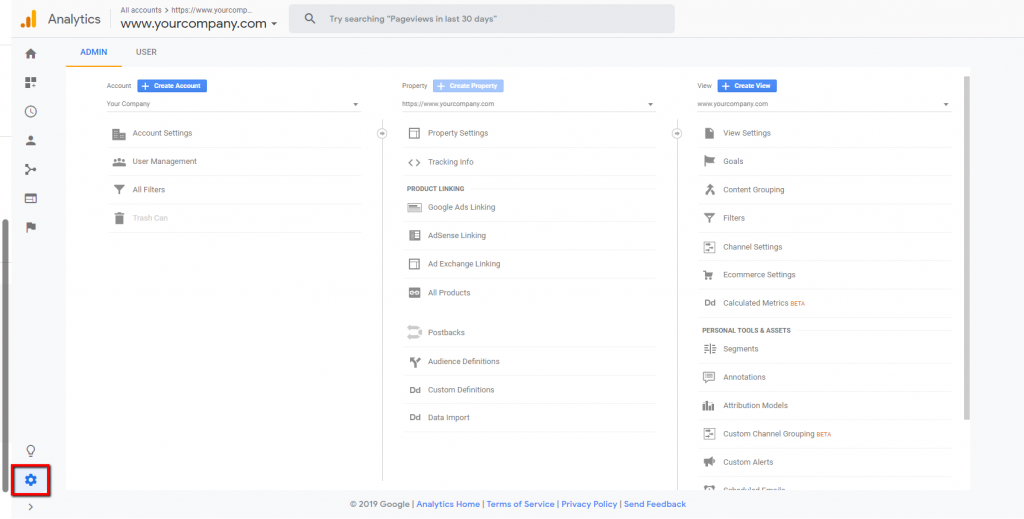
Table of contents
1. Organize Accounts, Properties, and Views
There are three tiers within Google Analytics: Account, Property, and View:
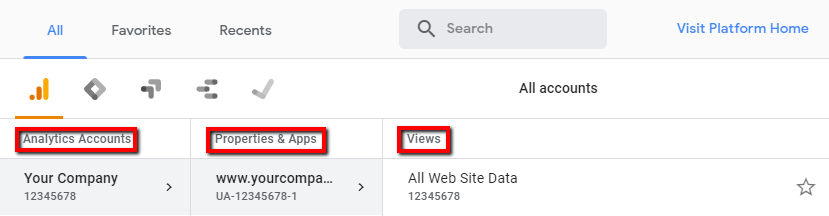
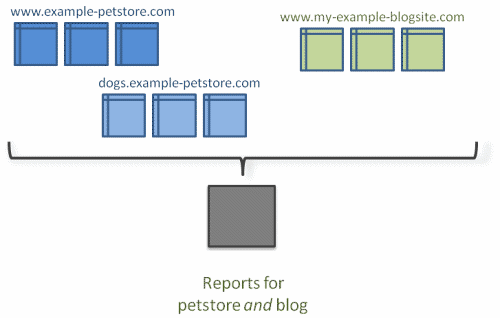
A single Google user can have multiple Accounts. A single Google Analytics Account can have up to 50 Properties, or individual websites. Properties, in turn, can contain up to 25 Views, which are custom reports for a Property.
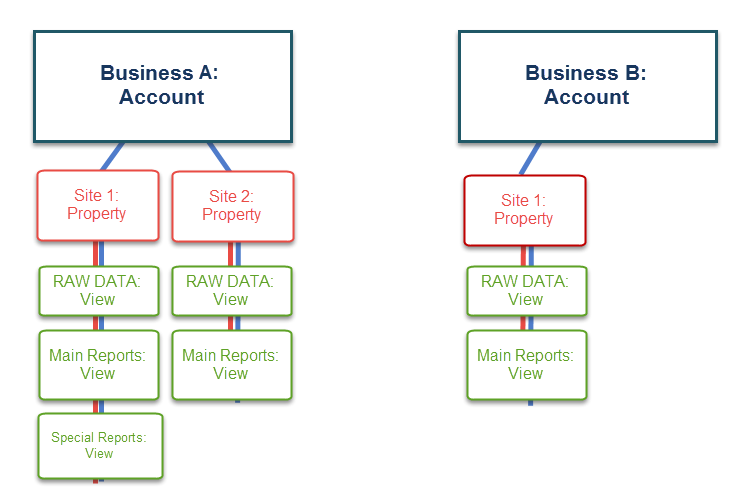
Here’s a visualization of a theoretical setup for two Google Analytics accounts:
Views are where your reports live. Within each View, you have an array of options to set high-level rules that affect how you see your data.
Each view has settings for ecommerce data collection, Site Search, Goals, Filters, Segments, Annotations, Channel Groupings, Custom Reports, Content Grouping, and User access.
Creating additional Views gives you more control and allows you to focus your visitor data through the use of different Goals, Filters, and settings on each View.
The main limitation is that Views collect data only from the time they’re created and forward. If you create View 1 in January and View 2 in July, View 2 won’t have any data from January through the end of June.
Create a “Raw Data” View for every Property in Google Analytics
The first View you should create is a “Raw Data” View. This View should have only features that collect data directly from trackers or Google: ecommerce, Site Search, Google Search Console, AdSense, and Google Ads. It should not use Filters or have Goals.
The Raw Data View ensures that there is always a place to check what your tracking code captures without any Filters or other changes. It’s a baseline comparison for changes to other Views.
If you’ve never created an additional View or changed the settings, your default View will be named “All Web Site Data.” Or, you can create a new View by clicking “+ Create View”:
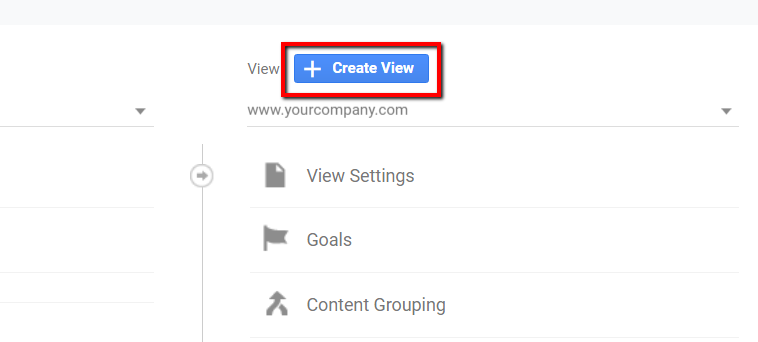
Name this one Raw Data, set it to your Reporting Time Zone (usually where your business is based), and click “Create View”:

Once you’ve done that, activate Ecommerce and/or Site Search (covered later in this article), authorize any linked Google products, and you’re all set. No other settings or Filters should be added to this View.
Naming Accounts and Properties in Google Analytics
Follow the “keep it simple” principle with names. For Accounts, use the parent business name. This will make your Account labels clear and searchable.
Each website for a business should have its own Property. For example, if you have an online store that sells custom yoga mats and a separate site for vegan cupcakes, each should have a unique Property and its own set of Views.
Multi-domain businesses and cross-domain tracking
Businesses with a more complex online footprint—for example, those with separate domains for a microsite, blog, and ecommerce store—may group separate websites within a single Property.
This effort can help “stitch” together Google Analytics sessions. It’s part of cross-domain tracking, which is complicated but essential for some sites.
If you manage Google Analytics for multiple businesses, give each business its own Account. This policy makes it easier to pass ownership to the business if you’re working in a contract or agency role.
It’s important to respect a business’s ownership of its site data. Responsible data management makes your life—and your clients’—far easier.
Once you hvae your Account structure in place, you can move one level deeper to manage Property-level settings.
2. Set up Property-level features
At the Property, or website, level, you have several tools, and settings that influence the reports available to you.
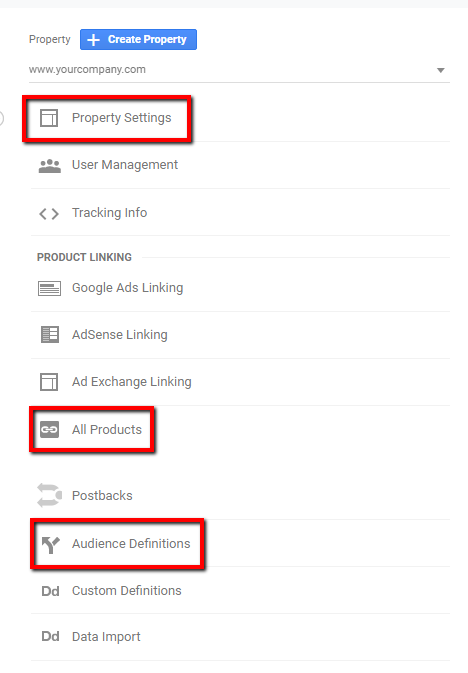
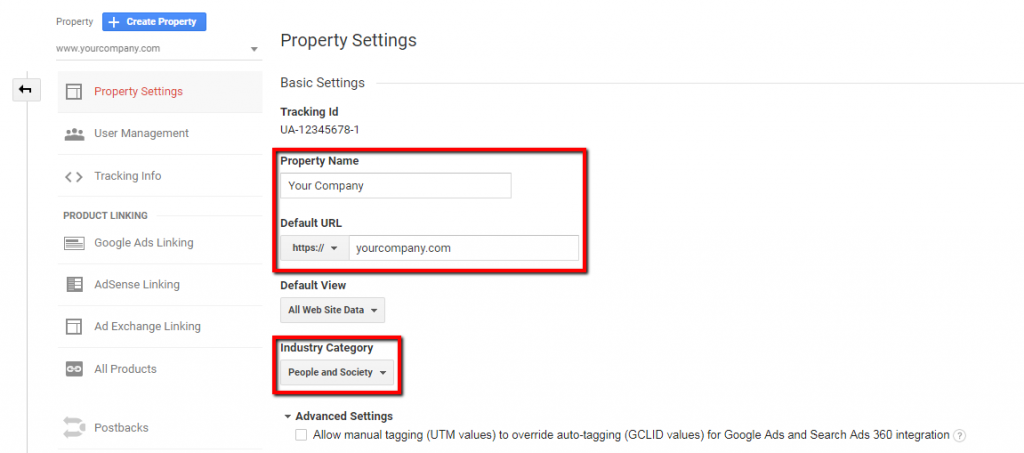
Under the Property Settings, you’ll see the option to rename your Property, update the default URL, select a default View, set your Industry Category:
From there, we get into the good stuff.
Data Collection for Advertiser Features
This enables a suite of reports that provide Google-based demographic and categorical interest data on your visitors, and allows you to use that data to create remarketing lists and research for display advertising campaigns.
Choose “Tracking Info” and “Data Collection,” then toggle the buttons to “On”:
This data is also useful in crafting campaigns in any other display platform that leverages demographic data for targeting.
Google Ads users who link their Analytics Accounts can create remarketing lists based on precisely segmented visitor data.
In addition to the Google Ads benefit, demographic and categorical interest data is visible through two sets of reports located under the Audience tab:
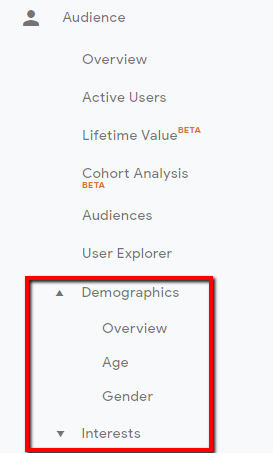
If you want to learn more about how to put those reports to work, check out this brief tutorial on Demographics and Interests reports:
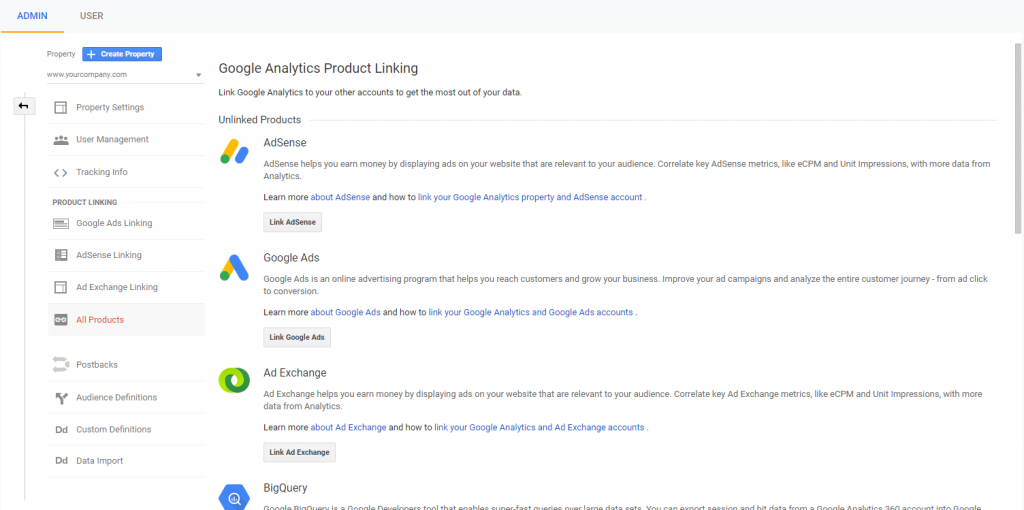
How to link Google Analytics with Google Search Console, AdSense, and Google Ads
Three major Google products connect to Google Analytics to give you a more holistic view of your online efforts:
- Google Search Console. Monitor your organic search performance.
- AdSense. See how on-site ads are making you money.
- Google Ads. Assess the impact of your PPC spend.
Google Search Console
In the era of “(not provided),” Google Search Console data is the best and, basically, only way to see which keywords bring visitors to your site, which pages they visit, and how that affects your bottom line.
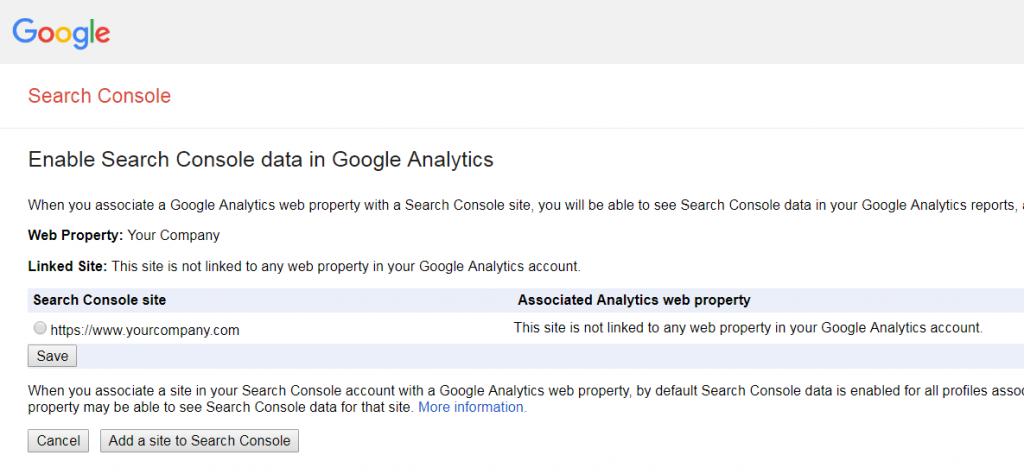
Under “All Products,” scroll down to “Search Console,” then click “Link Google Search Console,” and “Add”:
Then, choose the radio button for the Google Search Console account you want to link and click “Save”:
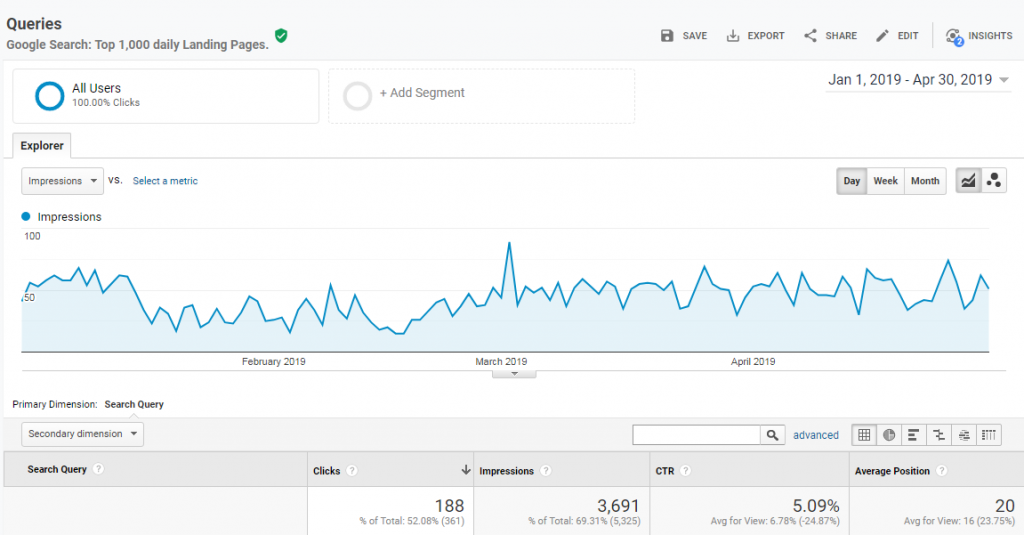
Adding Search Console unlocks reporting underneath the Acquisition section of your reports:
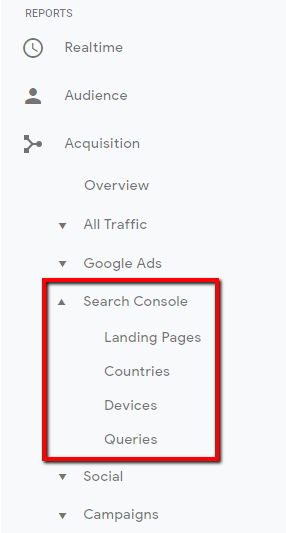
Unlike other Demographic or Google Ads data, Search Console data is segregated from your other reports, but it’s the best place to clearly see keyword data.
AdSense
If you run AdSense ads on your website, here’s the place to connect your Google Analytics account to AdSense:
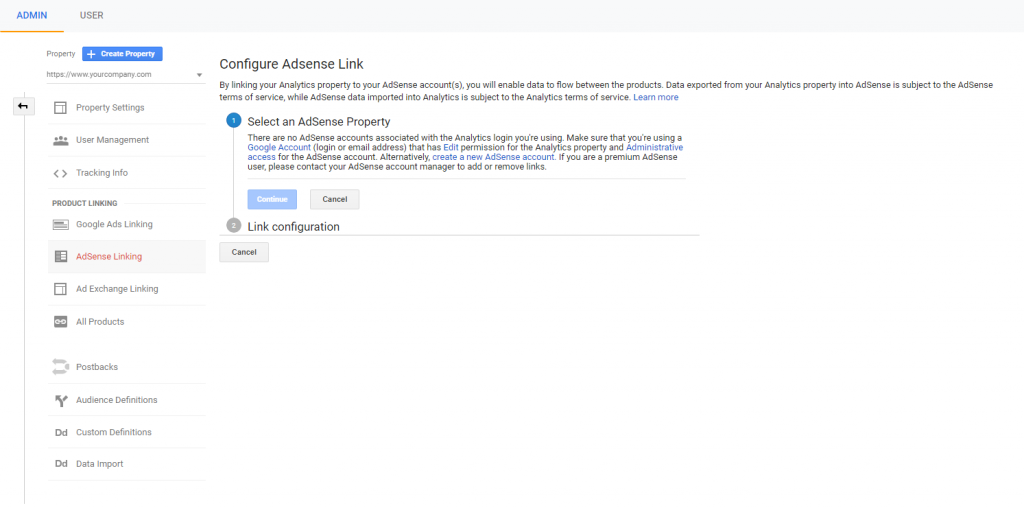
To set up AdSense you need a Google Account with “Administrator” access to your AdSense account and “Edit” permissions in Google Analytics. (Othewrise, as in the screenshot above, you’ll see a message that there are no associated AdSense accounts.)
After you click “Continue,” select the View or Views you want to pull in AdSense data, then choose “Enable Link” and click “Done.”
The AdSense link is an opportunity to match your visitor data in a holistic, advanced way with your AdSense data to fine-tune your content and site in a way that will maximize advertising revenue.
Google Ads
If you’re spending money with Google Ads, you should absolutely connect Analytics and Ads. The cross-tool functionality is extremely strong between these two products, and linking them together unlocks major benefits in each.
In Google Ads, you get:
- Access to your Analytics Goals and Ecommerce reports;
- Ability to use Analytics data to build laser-focused remarketing lists;
- Additional metrics from Analytics to use within Google Ads reports.
In Google Analytics, you get:
- Enhanced and more accurate multi-channel funnel data;
- 12 built-in reports powered by your Google Ads data;
- 25+ additional dimensions to use in Segments and Custom Reports.
Ecommerce sites in particular benefit from connecting to Google Ads. Merging Google Analytics Ecommerce tracking with Google Ads spend means you can create reports in both tools to help improve the efficiency of your spend.
Every Google Ads user can benefit from linking Google Ads to Analytics even if you don’t use Google Ads reports within Analytics. How? Google Analytics remarketing audiences.
Choose from pre-determined remarketing audiences or create a custom audience based on user behavior:
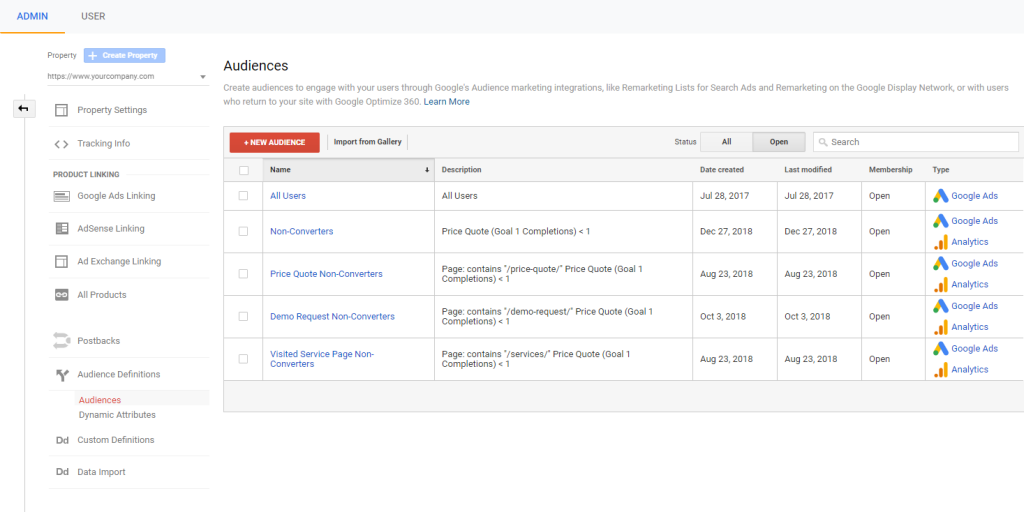
You can create remarketing audiences based on a number of attributes, like which pages a user visited or whether they did or didn’t complete a goal.
For example, if you’re a retailer specializing in clothing, you can create a segment to remarket to visitors who spent more than 3 minutes on your site, visited the t-shirt section, visited your shopping cart page—but didn’t convert. Then, you could display retargeting through Google Ads to encourage these visitors to return and complete their purchase.
To make the connection, you need need administrative access to the Google Ads account and “Edit” permissions in Analytics.

It takes just a few steps to link the two accounts in Google Ads:
- Click the tools icon in the upper-right corner of your account. Under “Setup,” click “Linked accounts.”
- Under “Google Analytics,” click “Details.”
- In the “Actions” column, click “Link” next to the Properties you want to link to Google Ads.
- Choose the View you want to connect with Google Ads, then select “Import site metrics.”
- Click “Save.”
3. Configure View-level settings
Going back to the View level, there are three things you can do to clean up reports and better understand visitor behavior:
- Add Filters;
- Exclude URL query parameters;
- Activate Site Search.
Add Filters
Filters keeps out Analytics data that your tracking code collects but that you want to exclude from a View. The most common use case is excluding data generated internally—all the site visits from employees of your company.
The easiest way to exclude those hits is to set up a filter that contains your office’s IP address. If you have multiple offices, you can create a regex string to capture all IP addresses:
There are other use cases for filters, too, like including traffic only from a specific domain or subdomains, or excluding hits from a development site that has active tracking code.
Additionally, you can create Custom filters if you want to create niche Views that pull in traffic from specific Campaigns, mediums, or a number of other variables.
Filters are applied only to incoming data, which means historical data won’t be affected.
Exclude URL query parameters
URL query parameters can track where visitors come from, hold information about a visitor’s shopping cart, or pass messages from one page to another. They are extremely useful and quite common, but they can muddy up your page-level data.
Why? Because Google Analytics counts every unique URL separately by default. One unassuming box, marked optional, is critical if you have:
- Tracking parameters appended to your URLs;
- System-generated navigation/content URLs that include parameters.
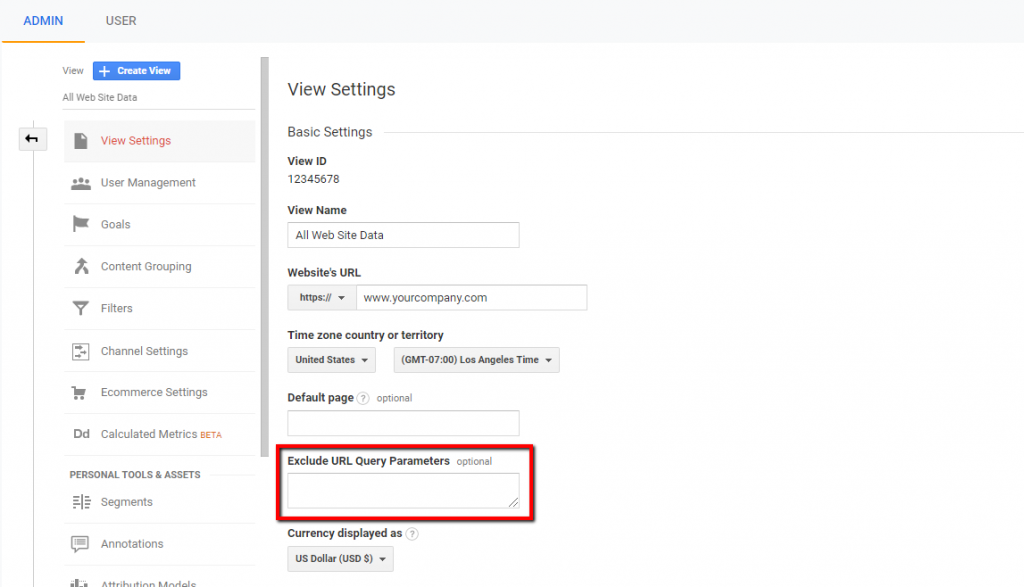
The field is a comma-separated, case-sensitive list of parameters you want Google Analytics to strip from your URLs. Include the text that comes after the question mark in the URL.
Note: UTM parameters are automatically stripped from URLs, so you don’t need to add them to the Exclude URL Query Parameters box. Add only custom, unique parameters like the one highlighted below.

In the example above, this is what you would add to the Exclude URL Query Parameters field:
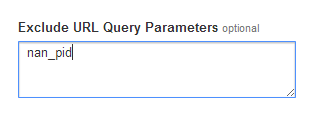
By entering the parameter “nan_pid,” field, Google Analytics would automatically strip nan_pid and any values associated with it from the URL. That, in turn, keeps the URL with the nan_pid parameter from appearing as a separate URL in reports compared to the URL without the parameter.
If you already have URLs with parameters in your reports, adding them here won’t alter those.
Activate Site Search
If you have a search function on your website that uses query parameters, you have access to important keyword insights that can improve your SEO efforts, as well as important user behavior metrics.
Site Search data has the potential to revolutionize your user experience. It can tell you exactly what your visitors want from your website.
Four main reports in the Behavior section of Analytics, 7 dimensions, and 16 metrics provide a rich repository of what Jared Spool refers to as “trigger words”—terms that tell you what people really want to do on your site but that you may overlook.
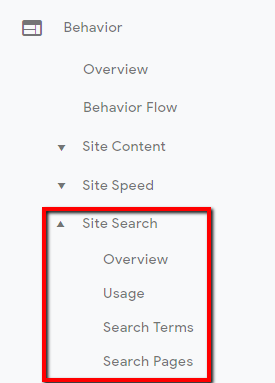
Turning on Site Search tracking opens a menu that allows you to list up to five parameters used in site searches. So, if the search box in the header of your site used “q=search+term,” and an advanced search page used “advq=search+term,” you would add both “q” and “advq” to the “Query parameter” box:
There’s a checkbox option to strip the query parameters associated with search, which means you won’t have to include your search query parameters in your Exclude URL Query Parameters list.
If your site uses categories within search, you can list those separately in the “Category parameter” box after toggling on the sub-feature.
Sites with a “search within department” function, like Amazon, might use both the Query and Category parameters:

If your site search doesn’t use query parameters, you can change your search engine (best option) or use a workaround with filters or Google Tag Manager.
4. Set up Goals to measure Success
Goal tracking is vital for conversion optimization and overall performance tracking. There are as many uses for Goals as there are definitions of success for websites, so let’s get into what Goals are and how to set them up.
What Goals are and why do they matter?
A Goal in Google Analytics is a set of criteria that you define to measure visitor actions on your site. A conversion occurs when a visitor performs a Goal-defined action.
Some additional notes on goals:
- Goal completions count once per session, so if a single visitor fills out the same contact form five times in a session, they trigger only one Goal conversion for the contact form.
- Visitors can complete more than one Goal per session. If Goal 1 is “visit the contact form thank-you page,” and Goal 2 is “watch a video,” a visitor who performs both actions during their session registers two conversoins, one for each goal.
- You can have up to 20 Goals in a single View, and they’re arranged in four sets of five Goals each.
- You cannot delete a Goal after it’s created. You can change the criteria, but any conversion history for the Goal will remain.
- You can pause data collection and hide Goals from your reports by switching the Recording setting to “Off.”
Setting up Goals will add data for conversion rates, goal completions, and Goal Value. Goals are also a subtab of all the primary Google Analytics reports that will allow you to focus in on your Goal data.
Goals also add additional dimensions and metrics for Custom Reports or Segments.
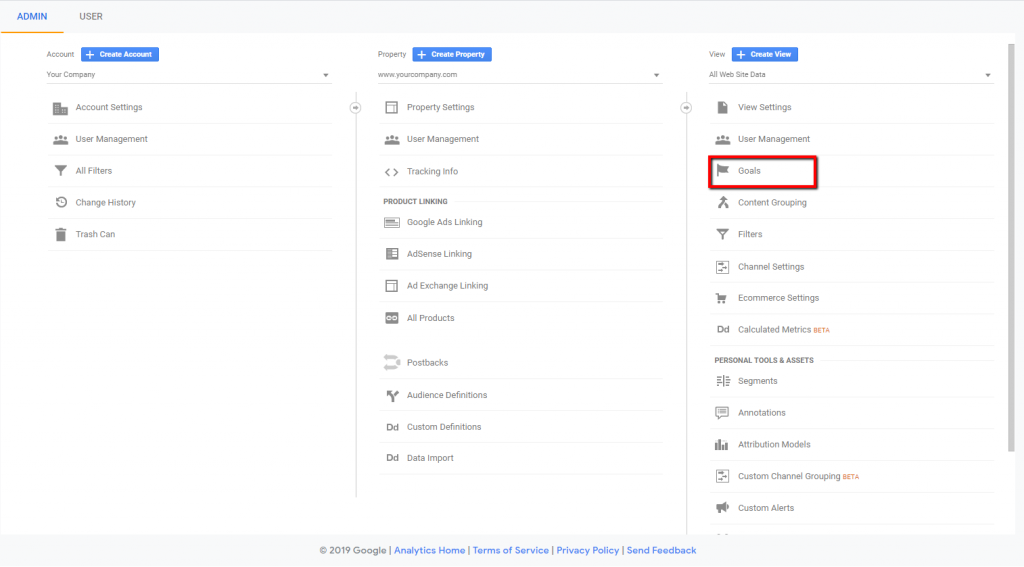
How to set up goals in Google Analytics
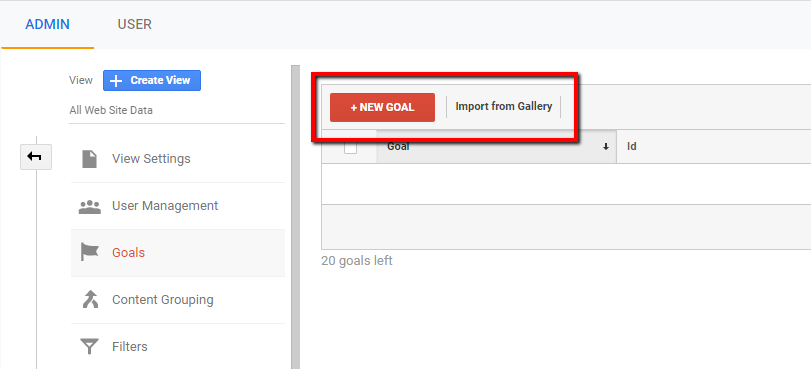
You’ll find your Goal settings in the View column of the Admin screen of Google Analytics.
You’re given two options at the top of the box: “+ New Goal” and “Import from Gallery.”
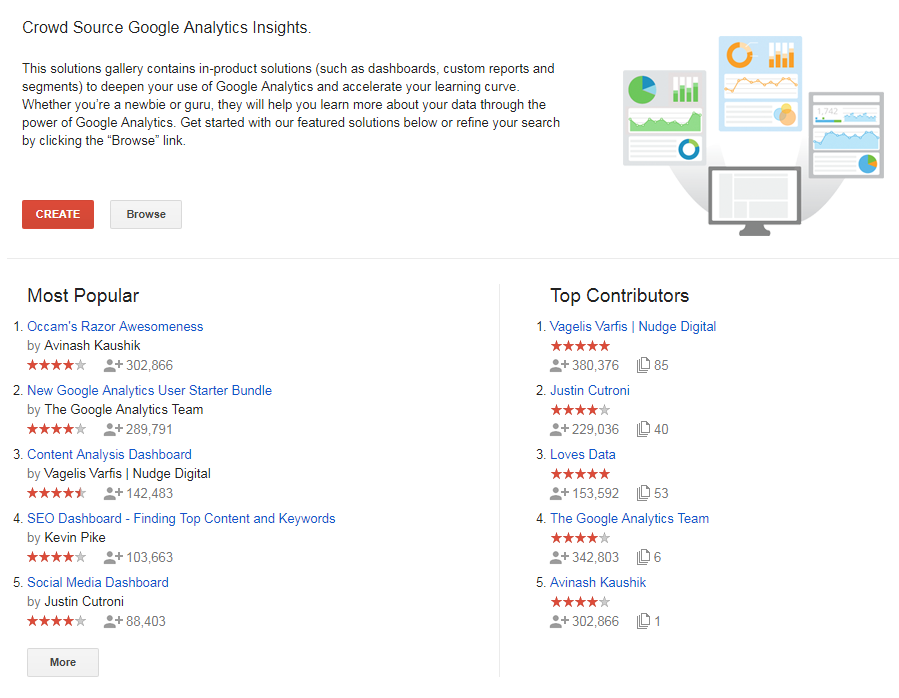
If you aren’t sure where to begin, try “Import from Gallery.” It will open an overlay with tools to show you different pre-made Goals submitted by users and provided by Google:
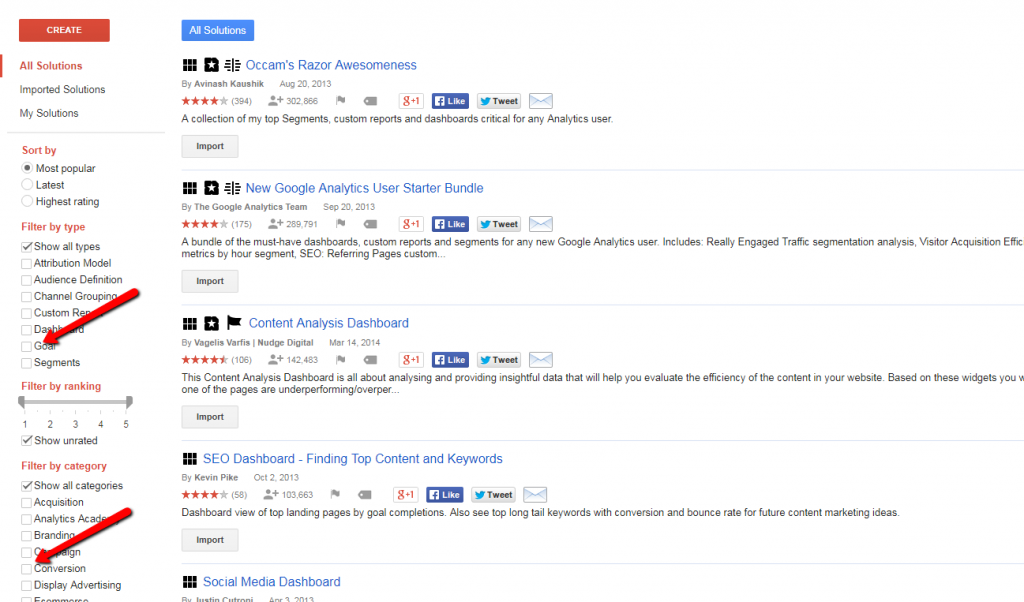
You can filter by category and rating, and sort the results based on rankings. Multiple elements can be imported, like dashboards, custom reports, and segments. Filter for Goals if you want to narrow your search:
If you want to create a Goal of your own, click on “+ New Goal” to begin the process. You can choose from nine Template Goals or a Custom Goal:
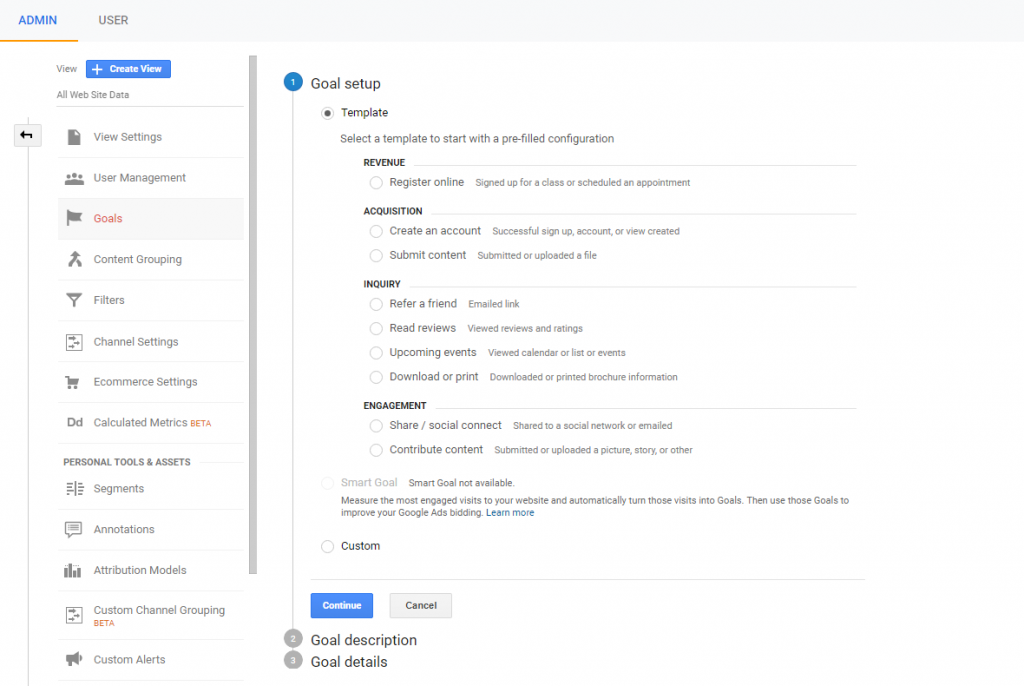
Choosing “Template” prefills the Goal Name and Type. Selecting “Custom” takes you to Step 2 with nothing prefilled or selected:
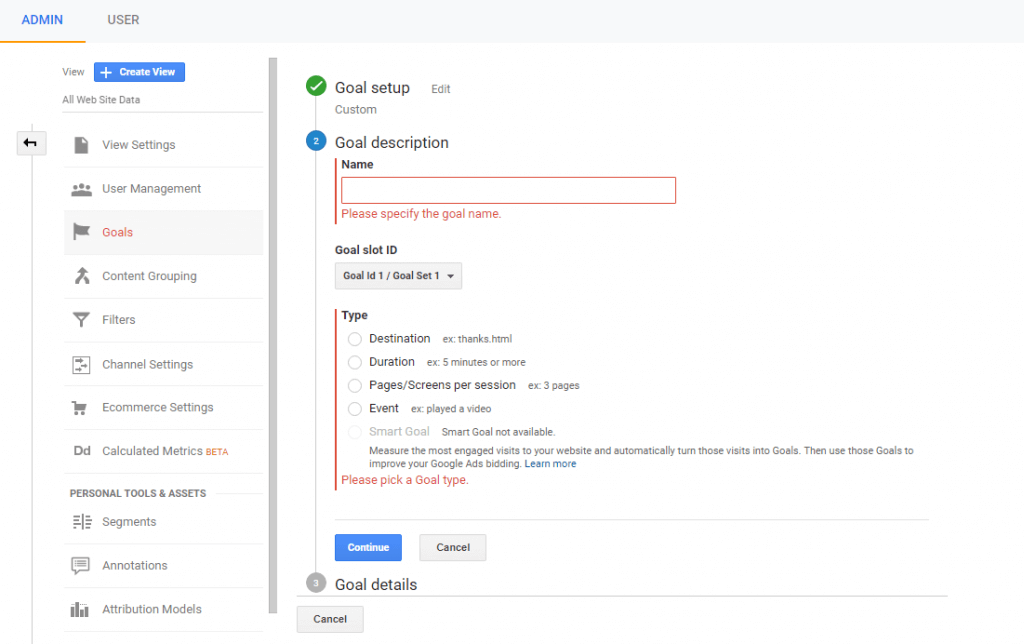
There are four types of Goals:
- Destination. A URL on your website that a visitor must hit, like a thank-you page.
- Duration. A length of time your visitor’s session must last.
- Pages/Screens per session. A number of pages each visitor must view per session.
- Event. A visitor must complete an action that triggers an Event.
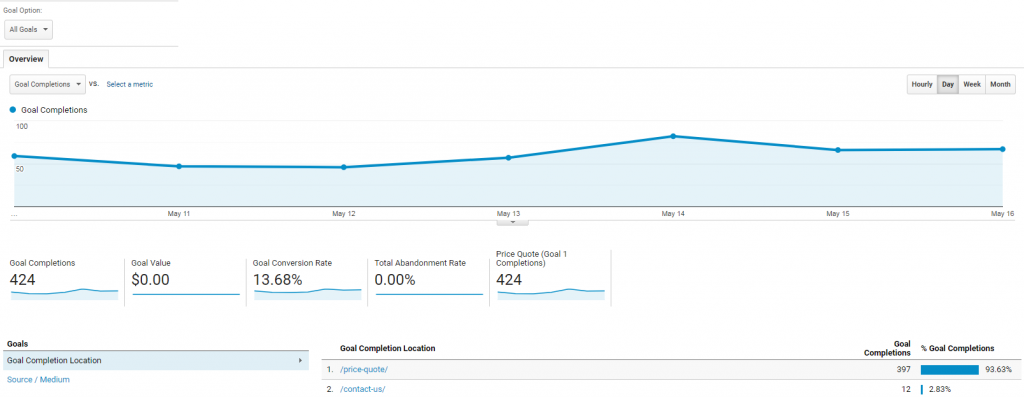
For this walk through, we’ll use Event tracking to measure requests for a price quote:
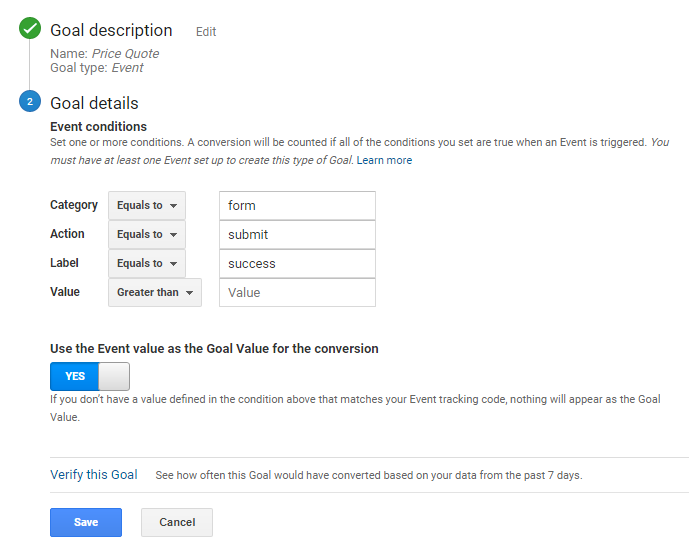
In this example, the Event variables are set up in form submission tool. In the Goal setup, we simply need to match the Category, Action, Label, and Value to those setup in the tool.
If you have a Value for the Event, you can keep “Use the Event value as the Goal Value for the conversion” toggled to “Yes.” If not, you can flip it to “No” and enter your own value.

The last option, “Verify this Goal,” will show you the conversion rate based on the last 7 days of data. (Goal tracking, once implemented, is not retroactive.) This verifies that Google Analytics found matching data for the Goal criteria. If it’s 0.0%—or far above or below what you expect—you made an error in your setup or don’t have any data yet.
Click “Save,” and you’re done!
Goals begin collecting data as soon as they’re created. You can test your new goal by looking at Conversions in the Real Time report:
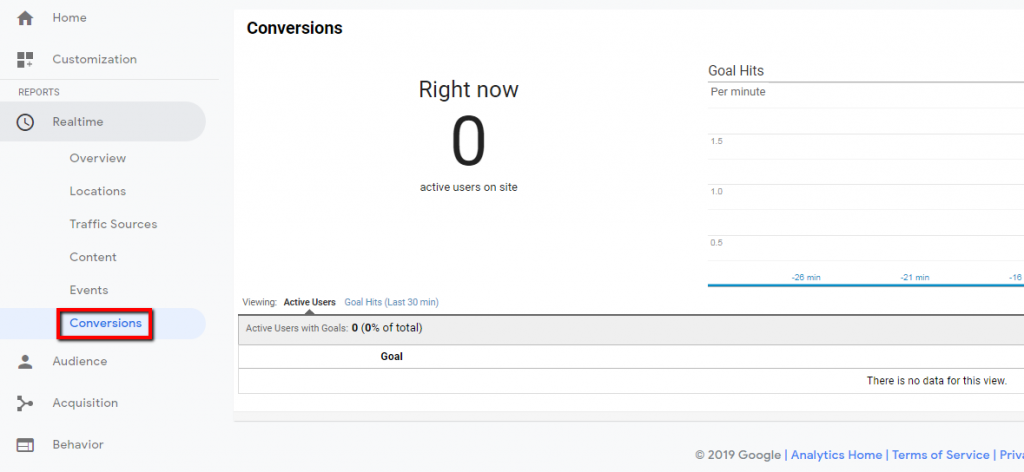
You should always test new Goals or other big tracking changes right away. This allows you to catch potential data errors before too much time elapses. You can always create a “Sandbox” View to test big changes before altering View-level settings in your core reporting View.
Conclusion
As you can see, even a “basic” Google Analytics setup isn’t as simple as copying and pasting a few lines of code. Hopefully, though, this guide will jump start your effort to make Google Analytics an invaluable asset in your marketing campaigns.
The proper setup means cleaner data, better organization, and accurate conversion tracking.
Related Posts
-

In digital analytics, it’s all about asking the right questions. Sure, in the right context,…
-
When you hear "data segmentation", it's tempting to feel overwhelmed. Why? Segmentation can seem daunting…
-
A/B testing tools like Optimizely or VWO make testing easy, and that's about it. They're…
-
This post is not a dry feature-by-feature comparison, nor does it include a winner-take-all verdict.…


Great overview! I was not yet familiar with the enhanced link attribution, but it sounds interesting. Going to implement that, thanks.
This is amazing information inside Gooogle Analytics, really nice with all screenshot: really useful both for expert and beginner. Thanks
A nice article that covers a lot of essential items that everyone should have in their GA setup. However you have missed one essential point in the enhanced attribution section that all elements/links must also have unique ids otherwise elements with the same link will have the proportion of clicks grouped together.
You’re absolutely right and the help article does point to that exact issue. I’d skipped it (well, partly for the overall length of the piece) in part due to the unclear definition of “ID” as established in that help article by Google. My general understanding is it will look for ID, which I assume is the id=”x” element, and failing a clear label, it will refer to DOM position to try to differentiate links, but may sometimes fail and provide rough estimates instead.
Halleluja! This is some really good stuff. Thank you for sharing.
Thanks so much for this incredibly helpful piece. It’s the clearest explanation I have seen yet as I stumble about trying to get all this set up to tell me something actionable. Cheers.
Fantastic Stuff!! I thought we were using Google Analytics. Boy, was I wrong. This will help us help our clients even more. Thanks Much!
Thanks for sharing useful tool information it has given very good information on digital marketing importance.
Fantastic article! Your point about Query Parameters reminded me of a problem I have. The CMS my site uses has multiple ways of recording the same page depending on different factors. E.g. when I look at my /basket page under the all pages report I get:
/sitename/basket.html
/sitename/process/x_91/basket.html
With traffic distributed about 2:1
This is repeated on my checkout & receipt pages. This makes it hard to setup accurate goal funnel reports. Any ideas how to address this problem?
Thanks for Informative Blog of Google Analytics, i am searching for this and got your blog, it helps with me to setup my Google analytics with awesome screen shots. thanks again :)
This is a great writeup; shared it with my digital team and they all walked away with a lot of information. Rockstar status.
wow tanx for this great tutorial
Fascinating post with plenty of useful tips and tricks for making the most of your GA account. Plenty of detail, it must have taken you some time to collate.
Thanks for sharing! :) I shared it too.